Full Title: Rainbow Bakes: 40 Show-Stopping Sweet Treats
First Published: 6th October, 2016
Genre: Cookery Non-Fiction
Contributors: Mima Sinclair (writer); Danielle Wood (photographer); Sarah Leuzzi (illustrator)
Available: Amazon.com | Amazon UK
This is a baking book full of rainbows and unicorns. The presentation is nice, with clear photographs and extra unicorn pictures adorning the pages. Recipes are split into four sections: whole cakes, small bakes, biscuits and cookies, and sweets and desserts.
Making things rainbowy means food colouring, which the book does discuss. The notes match my experiences. Liquid ones tend to flavour things when enough is used for dark colours, as well as often making mixtures too runny. The book doesn’t say it, but liquid red is a big culprit for taste, as it’s often beetroot. I used gel colourings, as these are easily available and go bright without making things taste odd.
The recipes have clear lists of things needed. Quantities are written out in full, so it says tablespoon rather than abbreviating it. This makes recipes a lot more accessible. There’s a wide range of things available, from fudge to bagels. Though the first impressions were good, the next step was to make things and see how the instructions held up.
My biggest project was the anti-gravity cake. This is a full-sized cake decorated to look as though rainbow sprinkles are pouring out of a floating jar above it, plus an optional unicorn. I chose this as a birthday cake. It isn’t noted in the recipe, but the unicorn used is from a toy range, rather than being sold as a cake topper. It makes it a good choice for children and adults like me, as it means the birthday person gets to keep the toy. I got the exact same unicorn as the book for my attempt at the cake. The only thing I switched out was the sprinkles: I used strands instead of confetti.
The instructions were clear and easy to follow. However, it suggests cutting the cake layers to make more layers. This would be fiddly to do and I couldn’t see a point in it, so I didn’t do that. The cake is already three layers deep and tall. Other than that, everything worked out. I made the dribble icing a bit too runny, so I didn’t get quite such a good effect. My blue was also different and turned teal when added to yellow buttercream. None of that was the fault of the instructions, and the differences were things someone wouldn’t notice unless they compared it to the book picture. I’d note this one does take a long time to do, as it has a lot of little bits to sort out. The final effect is good though.

Image Caption: A large colourful cake resting on a silver cake board. The cake is covered in teal buttercream. Purple and yellow icing dribbles down the edges. Pink buttercream is piped around the top edge. On the top, rainbow sprinkles fall down onto the cake from an apparently floating jar (spoiler: the falling sprinkles and jar are stuck to a stick). A white unicorn toy with rainbow mane stands near where the sprinkles fall on the cake. The background is a blue cloth with a silver dragonflies design.
An easier project was the rainbow fudge. It’s a quick fudge recipe, so it doesn’t need boiling. An oddity here is it needs melted white chocolate, but doesn’t suggest the common method of floating a plastic bowl in a saucepan of water. Though a heavy-bottomed saucepan can work for this, the bowl method is much less likely to burn, so I used the bowl. I also swapped the orange extract for vanilla, as it suits family taste preferences better.
This is a really quick recipe in some ways, but slow in others. It’s quick to melt everything down and make the basic fudge mixture. There’s not a lot to go wrong at this stage. What’s slower is the rainbow part, as the mixture needs to be separated and coloured. Then each layer needs a quick freeze before adding the next layer. It’s not difficult, but if cooking with children, this stage might be boring for them.
Cutting the fudge the next day was a bit challenging. I tried various knives, but ended up with the bread saw (a large serrated knife). It helped to freeze it for a few minutes between cuts. At this point, the fudge was very sticky, and would be difficult to transport. We ate it over several days, storing it in the fridge on plates covered in cling film. On the second day, it was firmer and much less sticky. If I was making this to take somewhere, I think I’d factor in that extra day of hardening.
The family really enjoyed the fudge. It mainly tastes of the white chocolate, so it’s worth getting good quality chocolate for it. This is one I can see making again.
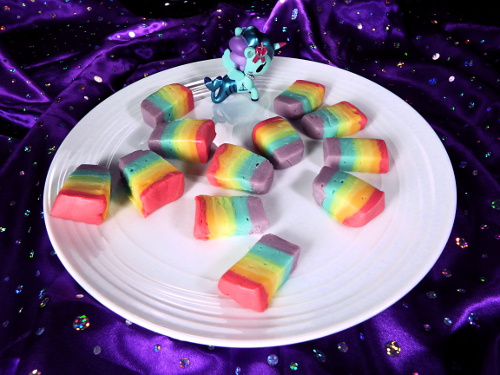
Image Caption: Rectangles of fudge on a white plate. Each piece of fudge has rainbow stripes of red, orange, yellow, green, blue and purple. They’re arranged in three semi-circles, as though they’re rainbows. A blue merunicorn toy also sits on the plate. The merunicorn has a boat symbol and is wearing an anchor hair ribbon, all modelled in plastic. The plate rests on a silky purple cloth with shiny spots.
My final choice was another of the sweet recipes, but one that’s more advanced. The fruit jellies are made in a similar way to jam, so it has more potential to go wrong if it isn’t boiled at the right temperature (it won’t set if it isn’t). This one also didn’t need artificial food colouring, so is a good choice for a sweet with nothing artificial. The main issue getting ready for this was the liquid pectin. For all the rest of the recipes, I got the ingredients from local supermarkets. This one had to be ordered, as I don’t have a baking shop locally.
I hit an obvious issue when I got started with this. The recipe recommends using a sugar thermometer, to make sure the boiling temperature is high enough. It’s a good idea in theory, but the average sugar thermometer is designed for people making big pots of jam. The quantities for the jellies were too small to cover the end of the thermometer. Usually, I’d simply have not bothered with the thermometer, but I figured a new cook would likely try to follow the instructions anyway. It’s a really bad idea. The thermometer can’t read the right temperature, and it can’t be attached to a small saucepan, so it’s a dangerous juggle to attempt to stir and test the temperature at the same time. The first batch did end up burning slightly due to this, though not in a way that couldn’t be salvaged (it just burnt a bit to the bottom, it didn’t flavour the whole mix). I never managed to read the required temperature on the thermometer.
For batch two and three, I went by my own experiences. That means I brought them to the boil, added the lemon juice and pectin as instructed, and then boiled rapidly for three to five minutes before testing. The recipe does explain how to test if it’s ready, by dropping some into cold water, which is all you really need. If it hasn’t hit the right temperature yet, it won’t pass the test.
The final jellies worked out fine. I made strawberry, blackberry and pineapple. The family were divided on which they liked best. I thought strawberry tasted a bit too much like solid jam, but that might be a plus for someone else. Pineapple was my favourite.
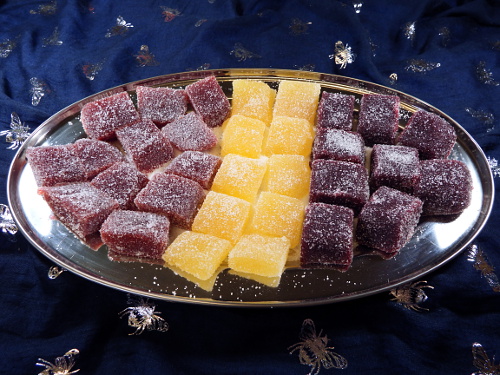
Image Caption: Fruit jelly sweets on a tray. The sweets are roughly square and covered in granulated sugar. From left to right, they’re strawberry (dark red), pineapple (yellow) and blackberry (reddish purple). The tray is oval and silver. It’s placed on a dark blue cloth covered with a silver bees design.
This is a book where it feels like someone had tested the instructions, as generally they were clear and tried to give advice on the best way to approach things. The photographs also looked like the actual items. What I expect happened with the jellies is the tester didn’t need to use a thermometer, so hadn’t hit that issue.
Something that isn’t mentioned is the unicorns in the photographs. Some look like cake toppers, but others are toys, such as the one for the cake I made. It might not be obvious to check toy shops, rather than baking shops, for these items. I used the same toy as the book for the anti-gravity cake, which is a Schleich Bayala rainbow unicorn foal. These are easily available in Europe (available at Amazon UK). It may be harder/more expensive to get this exact one elsewhere, but there are other designs from the Schleich Bayala range in the US (available at Amazon.com). These are nicely detailed toys and the range covers a whole bunch of fantasy animals and people.
The toy in the fudge photograph is one the book doesn’t use, but also came from the toy shop. It’s a Tokidoki Mermicorno (available at Amazon.com and Amazon UK). Note for these, you get a random one in each box. This is a pretty solid toy, but I felt it was expensive for what it was and not being able to choose the colour. On the other hand, the toy stands up firmly, which is good for a cake topper. It might also be just the look you’re after.
Unicorns could obviously be swapped out for other toys, to match the interests of the person receiving the cake. The main thing is to use plastic toys without any hair strands or the like, so the toy doesn’t leave bits in the cake, and the cake can be washed off the toy.
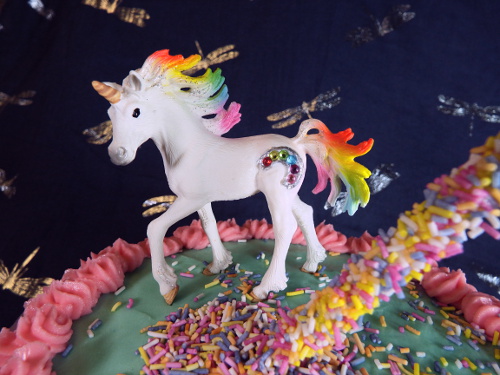
Image Caption: A close view of the unicorn on the cake. They’re a plastic model with a white coat, golden horn and hooves, and rainbow mane and tail. They have a horseshoe of rainbow gems on their back end. They have a front hoof raised as though about to walk. There’s glitter on the hooves, mane and tail.
Another possible use for these recipes is pride events and the like. There are a number of cakes with striped rainbow layers, which look a lot like pride flags. The piñata cake looks like a gender reveal cake with rainbow sweets, so could work for an adult having a non-binary gender reveal party.
Some recipes are more challenging than others. This means I wouldn’t advise anyone inexperienced to pick recipes to try at random. Start with easier ones like the fudge, and move on to the bigger projects later. Most recipes do use colourings, so it could be an issue if colouring is a problem. But some are coloured with fruit, such as the jellies, and natural colourings could be used for other recipes (these are usually paler, but would still be colourful). It would also be possible to do recipes without the rainbow part.
I thought this was a strong book that did what it set out to do. It’s whimsical and makes it clear how to handle layering all the colours. There’s a good balance between basic recipes and advice on how to make things look decorative. The rainbow fudge was particularly popular with the family, and I’m sure I’ll be asked to make it again.
 Full Title: Hello, Cupcake!: Irresistibly Playful Creations Anyone Can Make